This month’s photography lesson is all about the wonderful thing called editing. I use it in almost all my photos to sharpen features or clarity, to change the exposure, or to add a watermark (which I would recommend doing if you have a really nice photo). I’ll take you on a step-by-step adventure of how to edit a photo.
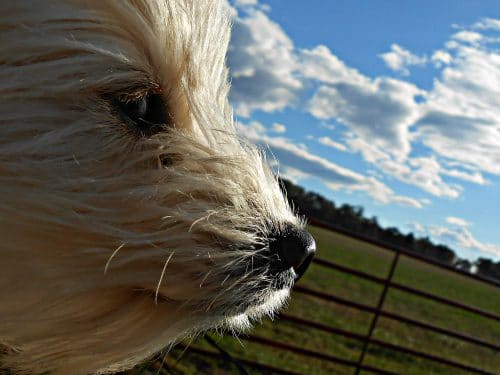
First, of course, take your photo and upload it onto your computer. Here’s a photo with no editing at all, right after it’s been uploaded:
 This is a cute little face, don’t you think? Such a pretty puppy! Ahem, anyway…
After uploading your photo onto your computer, go to a photo editing website. I use picmonkey.com (a free site that requires no account), but here are a couple others if you want to try them out: camva.com (which requires you to create an account, and some of their tools cost money) and ipiccy.com (another free site that requires no account).
Once you get into an editing site, click edit photo, or some button like that, which opens your documents and/or photos. Click on your desired photo and the site will take you to its editing station. The next steps are below:

Sharpen/Clarity:
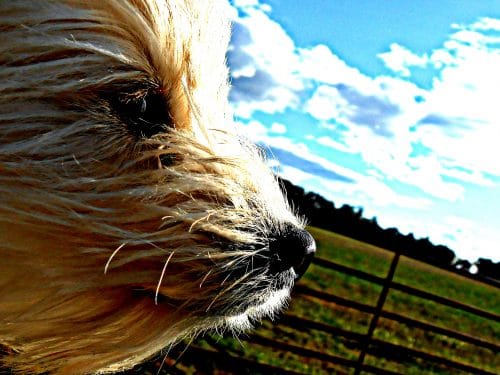
Once you get to the photo editing station of whichever site you desire, click on one of the buttons that says Sharpen and two meters should show up. One will be labeled Sharpen, or Sharpness, and the other will say Clarity. Click and hold these, moving them up or down until you reach your desired clarity and sharpness. Once you are done, you should have something like this:
 Not much of a difference yet, I know, but if you look closely at the fur and whiskers near the nose you can see that they stand out a little more than the photo earlier. Now make sure you don’t use too much sharpness and clarity; a little goes a long way. If you use too much of either, your photo will look grainy and pixelated.
Composure (brightness, highlights, shadows, and contrast):
Next, I usually move on to the composure which is, as you can see above, the brightness, the highlights, the shadows, and the contrast. The brightness is exactly what it says, it’s how bright you want the photo. This is especially useful if you took a photo in the wrong lighting or on the wrong setting for your camera. I usually don’t touch this meter, because I try to make sure I am in the right lighting and on the right setting before I take a photo; but if you need to brighten your photo, go right ahead.
The next meter (usually) is the highlights. With this meter you can control how bright or how dark your highlights are. See the white part on the dog’s fur, or the brighter half of the sky? That’s what this meter changes; it does nothing to the other parts of the photo that are in darkness. I usually brighten the highlights just a touch–don’t want to make them too bright.
The shadows meter does exactly the same as the highlights meter, except it changes the darker areas of the photo instead, like the black part of the dog’s eye and nose, and the darker half of the sky (which isn’t that dark to start with, lol).
The contrast is the difference between the dark parts and the light parts. Depending on how high or low you put this meter, you get a more defined difference between the light and the dark, or a less defined difference, depending on which way you go.
 See? Now you can see the difference, can’t you? Really though, go easy on these features. Although they may be “better looking” if you use more of each, people can usually tell as soon as they see it that this is a photo that’s been tampered with. The point of editing is to enhance the photo you already have, not to completely change it. Here’s an example of what is too much:
 Oh my, this is terrible! Too much, too much! So please, go easy on the tools.
Watermarks:
Okay, this is a pretty simple tool. First go to the side bar, and on picmonkey.com there is a big letter T which you click on. Then a bunch of different fonts should show up. Choose the font you like and click “add text.” A box should show up on your photo, which you can move around to where you want it, make it bigger, and all that. Then you can choose the color, type your text, and presto, you’re done.
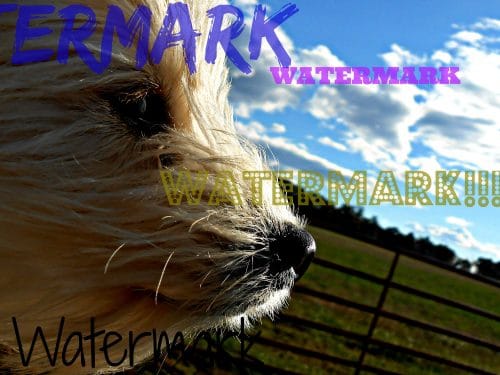 Now of course you won’t use this many (or will you?) and you won’t use the word “Watermark,” but you get the idea, right?
That’s it! Whew, that was a lot of writing. See you next month for the final post!
LIMITED TIME AVAILABILITY – We list a lot of awesome individual resources for photography throughout this post — but The following BIG collection of resources for photography instruction is only available for the next six days. A new set is published each year and offered for seven days only at 97% off. Be sure to check it out before this sale ends!
Do you have a child interested in PHOTOGRAPHY? We purchased the 2015 Ultimate Photography Bundle for my oldest daughter who will be attending college for Graphic Design next year. She plans to do some photography course work in college if for no other reason than to avoid the cost of stock photography as a graphic artist. So — she has worked through much of that material this year as a High School credit in photography in preparation for college and just for fun too. This is an excellent way to use the Ultimate Photography Bundle as a homeschool mom.
In fact – my daughter has already asked me to make sure I purchase the new one!
I am super excited about the NEW 2017 Ultimate Photography Bundle because it contains even more value and many of the industry leaders have contributed products this year which is just amazing. The value is over $4000 AND the actual purchase price is over 97% off.

What we did was go through the resources and pick out the ones that covered skills my daughter needed to learn. She has worked through the e-courses and books we picked out one at a time this year – but it is all self-driven. It doesn’t come with a schedule for homeschoolers since it is intended for adults who want to improve their photography or start a photography business but it works really well for self-motivated high school students. She is a senior in high school this year. I can see it working well for a motivated and mature student in Junior High if you give some initial guidance, but it just depends.
It comes with over $4000 in resources so there is lot in there and it can be overwhelming but they do have a guide included to help you figure out where to start and that might be very helpful for homeschool students or their moms to figure out which resources are a good place to start!


Leave a Reply