Encouraging Moms at Home

Tips, Tricks and Tools for the #MomWin

  • Home
  • About Us
    • Contact Us
    • Brand Inquiries
    • Full Disclosure
    • Our Writing Team
  • Homemaking
    • Cleaning
    • Essential Oils
    • Recipes
      • Instant Pot
      • Gluten Free Dairy Free
      • Using Produce
      • Cooking with Pumpkin
    • Nutrition
    • Food Preservation
  • Homeschooling
    • Homeschool Resources
    • Homeschool Encouragement
    • Homeschool High School
    • Special Needs
    • Homeschooling Art
    • Homeschool STEM
    • Charlotte Mason
    • Homeschool Technology
    • Teen and Tween Writers
    • Homeschool Notebooking
  • Teaching Ideas
    • Free Printables
    • MInecraft
    • LEGO
    • Fine Motor Skills
  • Family Life
    • Gift Guides
    • Kid’s Activities
    • Summer Fun
    • Hiking
    • Moving
    • Christian Life
      • Christian Family Activities
      • Scripture Memory
      • Poetry
      • Creation
      • Advent and Christmas
      • Thanksgiving
  • Moms
    • Encouragement
    • Budget And Finances
    • Mom Fashion
    • Date Your Spouse
    • Work At Home
  • Shop
    • My Account

Wrapping Up : How Lights, Angle, and Editing All Work Together

by Hailey W Leave a comment

Posts contain affiliate links. This means, if you choose to make a purchase, I will make a commission at no extra cost to you. For more information please see our full disclosure.
6 shares
  • Facebook5
  • Twitter

Hey guys, Darkroomdiva here.

So you’ve learned about lighting, you’ve learned about angle, and you’ve learned about editing. Now it’s time to learn about how all those work together.

Since I’ve taught you all the main factors of photography, teaching you how they work together will not take too much of your time.

pics 006

This is a photo with no editing. As you can see, I chose my lighting and angle–I took a picture indoors, but I took advantage of the natural light that was coming through. It was overcast outside, so not too much light came in, giving the picture a duller tone. I used a close-up angle, just flat though, not at a tilt. Depending on the photo, you can tilt it however you want; I would say, though, that landscapes are the best option if you decide to angle your camera more.

Homescoolencouragement.com

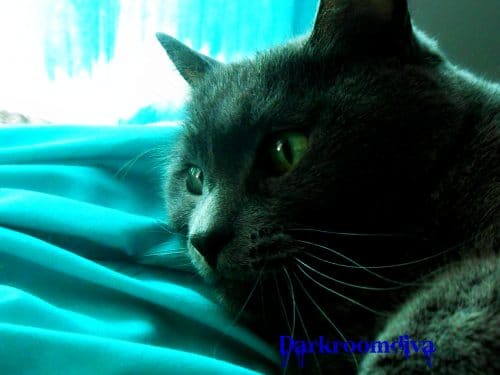
This is my photo after editing. I lowered the brightness and enhanced the shadows, giving the photo a little more contrast (I went higher for that meter too). I sharpened the picture and enhanced the clarity just a tad. Then I added my penname in the bottom corner using the text button. Also, if you’re not shy about playing around with some of the tools on picmonkey (which I used for this photo), you can go into effects and try out some of those. I did use one effect called bloom, which smooths out the fur a bit and gives the photo a softer feel.

 If you want to try something different than what I have been teaching you in this series, then go right ahead. Just like any other art, there really is no “right” way to do it, it just depends on your artistic style. Think of what I have been saying about photography more as guidelines than rules.

 I hope you have enjoyed my series on photography, and that you received some help on this topic. God bless you all,
Darkroomdiva

Disclosure

6 shares
  • Facebook5
  • Twitter

Leave a comment
Homeschooling, Teen and Tween Writers

Leave a Reply Cancel reply

Your email address will not be published. Required fields are marked *

Get Sam’s Club Half Off!

Search

Keep In Touch

  • Shop
  • Contact Us
  • Facebook
  • Twitter
  • Instagram
  • Pinterest
  • About Encouraging Moms at Home
  • Brand Inquiries
  • Full Disclosure with Privacy Policy
  • Our Writing Team

Kids Can Learn with LEGO Bricks

Our Latest Shenanigans

Follow on Instagram
Copyright ©2025, Encouraging Moms at Home. All Rights Reserved. Custom design by Pixel Me Designs